MCS-177 Project 9: Image Processing (Spring 2017)
Start: Friday 05/12; Due: Wednesday 05/17, 11:55pm (Note: in reality, you will have until 8am the next day. However, once the Moodle cut-off time is passed, no late submission will be taken, so you should submit your partial work, even if it's not completed.)
Overview
In this project, you will learn how a computer can modify images. You will be programming transformations similar to those built into image processing programs such as Instagram and Photos app.
Please find a partner for this project. Please only submit one copy of the code with both names written in project9.py as comments.
To expedite grade reporting (for graduating seniors), please also write your name and your partner's name (if any) in the text box on Moodle.
Reading homework and quiz
- Read, run the active code, and do the quiz iter-9-1 on the Sec 8.10.1 (Pixel data type) and check your answer:
#the-rgb-color-model
-
Reading 2: Read, run the active code, and do the quiz iter-9-2 on the Sec 8.10.2 (Image data type) and check your answer:
#image-objects
-
Reading 3: Read, run the active code, and do the quiz iter-9-4 on the Sec 8.10.3 (Image processing and nested iteration) and check your answer:
#image-processing-and-nested-iteration
Task 0
Warm-up for Task A and B (don't submit)
-
Read and run this sample program:
Function for manipulating an image from file (negative and grey)
-
Play with this sample program (note how a function object is passed as an input parameter):
General function for manipulating an image from file (negative and grey)
Task A (sepia tone filter)
- (Reference: Exercise 6.17 on page 204)
Sepia tone is a brownish color that was used for photographs in times past.
The formula for creating a sepia tone is as follows:
newR = (R x 0.393 + G x 0.769 + B x 0.189)
newG = (R x 0.349 + G x 0.686 + B x 0.168)
newB = (R x 0.272 + G x 0.534 + B x 0.131)
- Download the file
project9.py
which is a template for project 9.
Put all your work in this file.
- Write a pixel function for sepia toning. Name the procedure
sepiaTone, and include a contract and a descriptive docstring.
For uniformity, convert the RGB values to be integers between 0 and 255 using the int function.
>>> int(12.4)
12
>>> int(12.9)
12
Then think about how you would make sure each value is no larger than 255, using the min function.
>>> help(min)
>>> min(12.3, 4.5)
4.5
Test your sepiaTone procedure against various pixel values:
>>> from cImage import *
>>> from project9 import *
>>> apixel = Pixel(10,200,100)
>>> sepiaTone(apixel)
(176, 157, 122)
>>> apixel = Pixel(10,255,0)
>>> sepiaTone(apixel)
(200, 178, 138)
- Write the contract and implementation for a procedure
transformPixels that takes an image object and a procedure that transforms a pixel and returns a new image (of data type EmptyImage) with all the original pixels transformed by the given procedure.
Include a descriptive docstring.
-
To test your
transformPixels procedure,
first copy the negativePixel and greyPixel procedures
from the file
General_Manipulate_Image.py
and paste them into your project9.py file.
Now you can test your transformPixels procedure procedure using your negativePixel and greyPixel procedures and a .gif file:
>>> from cImage import *
>>> myimg = FileImage("hello_dear.gif")
>>> myimg_negative = transformPixels(myimg, negativePixel)
>>> myimg_grey = transformPixels(myimg, greyPixel)
>>> isinstance(myimg_grey, EmptyImage)
True
-
Test your
transformPixels procedure using your sepiaTone procedure and a .gif file:
>>> from cImage import *
>>> myimg = FileImage("hello_dear.gif")
>>> myimg_sepia = transformPixels(myimg, sepiaTone)
>>> type(myimg_sepia) # this should say 'cImage.EmptyImage'
Task B (EXTRA CREDIT - show your instructor)
Instruction: To receive the extra credit (a few points) for this work, show your work and do a demo of it (that is, apply your gamma filters to a picture that is too bright/too dark) in front of your lab instructor on Tuesday, May 16.
Both partners should be present during the demo.
When you take pictures, you sometimes find that the pictures are too bright or too dark to see anything in them. Gamma correction allows you to compress or expand the range of luminance in images. It changes the luminance following the power-law expression:
However, pixels in our images are in RGB, not in YUV. The following formulas will help you convert between RGB and YUV values.
- Convert the RGB values to YUV.
Y = 0.00117 * R + 0.00230 * G + 0.000447 * B


U = -0.000577 * R - 0.00113 * G + 0.00171 * B


V = 0.00241 * R - 0.00202 * G - 0.00039 * B
- Adjust Y using the gamma formula discussed above.
Ynew = (Yold)gamma
- Convert YUV back to RGB.
R = 255 * (Y + 1.13983 * V)


G = 255 * (Y - 0.39465 * U - 0.58060 * V)


B = 255 * (Y + 2.03211 * U)
Modify the RGB values if necessary to make them no smaller than 0 and no larger than 255.
- Write the contract and implementation for a procedure
gammaN that takes a pixel object and a number. It performs a gamma correction with the gamma value of the input number, and return the new pixel.
- Write the contract and implementation for a procedure
gammaTwo that takes a pixel object and performs a gamma correction with the gamma value of 2.0 and return the new pixel.
- Write the contract and implementation for a procedure
gammaHalf that takes a pixel object and performs a gamma correction with the gamma value of 0.5 and return the new pixel.
Note: You may not repeat code lines for the procedure gammaHalf and gammaTwo. What you need to do is create a third function called gammaN (as described above) which takes in a pixel object and a number. This third function should then be called by both gammaHalf and gammaTwo.
-
Test your procedures against various pixel values.
Test your procedures using your the
transformPixels procedure and a .gif file:
>>> from cImage import *
>>> myimg = FileImage("hello_dear.gif")
>>> myimg_gammaTwo = transformPixels(myimg, gammaTwo)
>>> isinstance(myimg_gammaTwo, EmptyImage)
True
Warm-up for Task C
- Warm up:
Play with and run the test for these finished procedures:
procedures for enlarging and flipping an image
-
Complete and test these unfinished procedures (note how the contract for each procedure is the same as your contract for Task C):
procedures for doubling, rotating counterlockwise, and rotating clockwise
Task C (rotation)
First, try to figure out how you and your partner may accomplish this task on your own.
Otherwise, see Monday lecture.
Write the contract and implementation for a procedure rotated that takes an image object (either a FileImage object or an EmptyImage object ) and returns an image of the original image rotated 90 degrees counterclockwise (the popular convention used in Calculus textbooks and popular imaging apps). The returned value should be in the form of an EmptyImage object (which is no longer empty).
>>> from project9key import *
>>> im = FileImage('dear_daniel.gif')
>>> rotim = rotated(im) # nothing appears!
>>> isinstance(rotim, EmptyImage)
True
Note that, in order for you to view the rotated image, you have to first create an ImageWin object and then use the method draw.
You will do this in Task D below.
Task D (Displaying multiple images on one canvas)
First, try to figure out how you and your partner may accomplish this task on your own.
Otherwise, request to see your instructor/TA's solution on Tuesday.
Write the contract and implementation for a procedure drawImages that takes a title and a list of FileImage or EmptyImage objects and draws the images on a new canvas. The images will be drawn onto the canvas side-by-side horizontally with 20-pixel-wide gaps.
Make sure that the canvas is just wide enough and tall enough (not any wider or taller than necessary).
Make sure the title is shown correctly.
Include a descriptive docstring.
For example,
the following statements
>>> img2 = FileImage("hello_dear.gif")
>>> img2rot = rotated(img2)
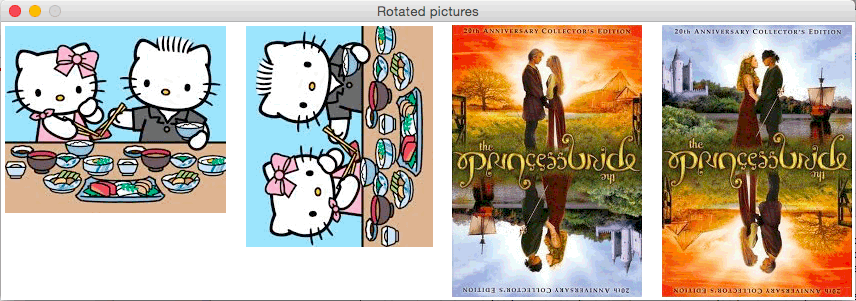
>>> img3 = FileImage("princess.bride.gif")
>>> img3rottwice = rotated(rotated(img3))
>>> list_of_sample_gifs = [img2, img2rot, img3, img3rottwice]
>>> drawImages("Rotated pictures", list_of_sample_gifs)
should show the following window (after a few seconds)

The words "princess bride" look the same in the two images
because this is an ambigram for the cover of the 20th anniversary edition of Princess Bride.
For example, the following statements
>>> img1 = FileImage("dear_daniel.gif")
>>> img2 = FileImage("hello_dear.gif")
>>> img3 = FileImage("princess.bride.gif")
>>> img4 = FileImage("gus_winner.gif")
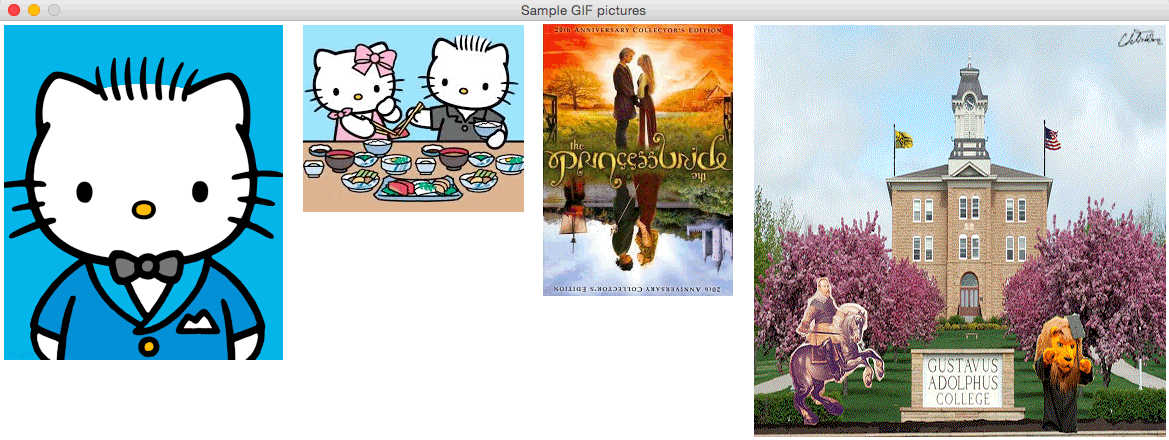
>>> list_of_sample_gifs = [img1, img2, img3, img4]
>>> drawImages("Sample GIF pictures", list_of_sample_gifs)
should show the following window (almost instantly)

The following statements
>>> img1 = transformPixels(FileImage("dear_daniel.gif"), sepiaTone)
>>> img2 = transformPixels(FileImage("hello_dear.gif"), sepiaTone)
>>> img3 = transformPixels(FileImage("princess.bride.gif"), sepiaTone)
>>> img4 = transformPixels(FileImage("gus_winner.gif"), sepiaTone)
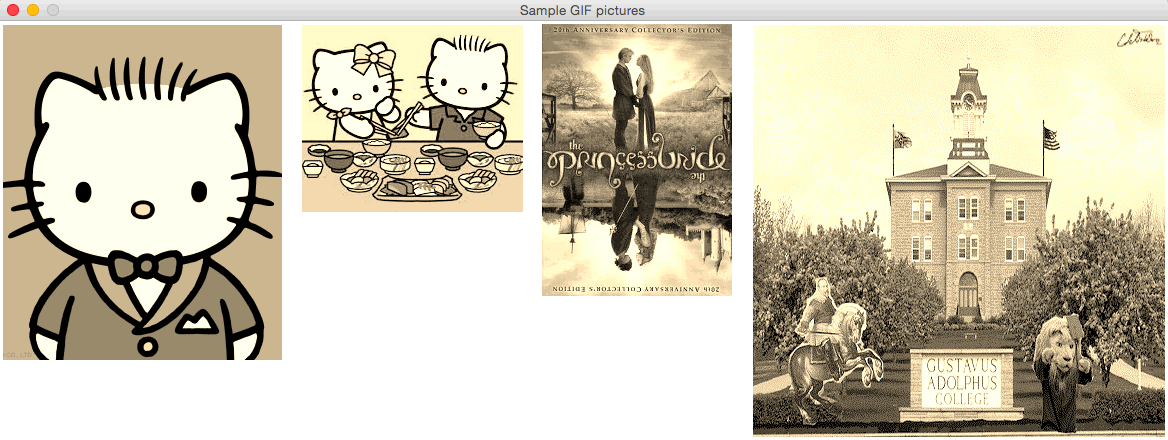
>>> list_of_sample_gifs = [img1, img2, img3, img4]
>>> drawImages("Sample GIF pictures", list_of_sample_gifs)
would show the following window with images in sepia tone (after you wait several seconds for the sepia tone filter to be applied)

Finally, write some tests for all your work.
Under the selection statement if __name__ == '__main__': in your file, write a few Python statements (similar to the example statements given above) to show the original image and at least two manipulations of the image in the same window using the procedure drawImages.
NOTE: Make sure you do not write these statements outside of the selection statement if __name__ == '__main__':
NOTE: Please re-download the template file project9.py. I have updated the test files to reflect the fact that you do not need to submit Task B!
Task E (disappearing images, optional)
Study and run the following module project9_disappear.py which shows
one image fading into another.
Notice how our program chooses the minimum of the dimensions of two images.
Modify this program so that you can choose the maximum of the dimensions of two images. Try changing the number of iterations by changing the values within the for loop in the statements at the bottom of the file.
Create some other (small!) GIF images, maybe two pictures of yourself.
Change the statements at the bottom of the program so that
now the program displays beautiful images of you and people you know instead of Dear Daniel and Hello Kitty.
See if you could modify the code further. Maybe you want to just make the center of the window be changing instead of the whole window.
Maybe you want to make this program go a bit faster by recycling the same EmptyImage object while you go through the for loop
instead of creating a brand new EmptyImage object at each iteration.
Modify the program again. Try merging three images instead of two.
Submitting your work
Submit your code using Moodle; click on the following link for instructions on submitting code using Moodle.
In the text box on the Moodle submission page, please write your name (and the name of your partner, if you have one).
You're also required to submit one Python file called
project9.py
which is a modification of the given template file and
contains all the Python procedures (Tasks A, C, and D) and your tests (under the selection statement if __name__ == '__main__':) as described above.
- Do not write a test in your file which is outside the
if __name__ == '__main__': statement.
-
At the top of your file, include the full names of both partners, credit (e.g. the Python documentation, the textbook, other sources, and individuals that you discussed this project with),
project description, and date. If you use any online forum or textbooks other than ours, please include the website address/ textbook name.
-
Note that there are various versions of
cImage.py.
Before you submit, make sure that your work runs perfectly on IDLE on the computer lab machines.
-
For uniformity, import the
cImage module using the following statement at the top of your project9.py file:
from cImage import *
If you are using your own GIF images (that is, not the ones you downloaded from
project9_gif_images.zip) in your tests, please upload them (no more than five).
Grading Rubric (out of 20 points)
5 pts: miscellaneous. Partial credit possible.
(1pt) You wrote a correct file name and correct procedure names.
Your procedures do not throw an error when called following the given instructions.
(1pt) correct contracts,
(1pt) descriptive docstrings and variable names.
(2pts) You wrote thorough tests for all four of your procedures, written under the if __name__ == '__main__': statement.
Make sure your procedures work on images that are not squares!
5 pts: Task A. Partial credit possible.
(2pts) sepiaTone returns a Pixel object with correct values for different inputs.
(3pts) transformPixels returns an EmptyImage object of correct values when for the downloaded images and filter function that is sepiaTone, negativePixel, and greyPixel.
5 pts: Task C. No partial credit (since you are guided to the solution during class).
Make sure you are not just calling three times a procedure which rotates an image object clockwise (see email).
5 pts: Task D. No partial credit (since you are guided to the solution during class)
A couple extra credit pts: demo of Task B (extra credit)


